|
|
#1 |
|
Участник
|
dynamicsax-fico: Go Live Setup Checklist
Источник: https://dynamicsax-fico.com/2017/12/...tup-checklist/
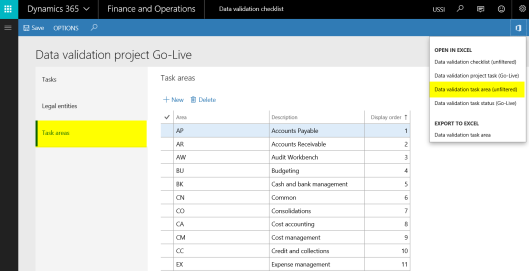
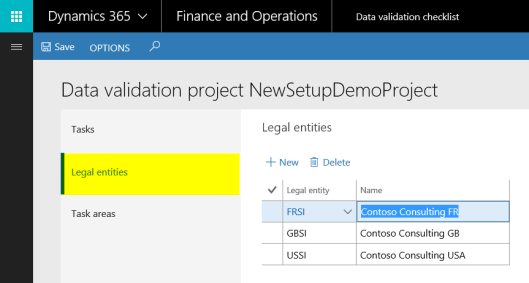
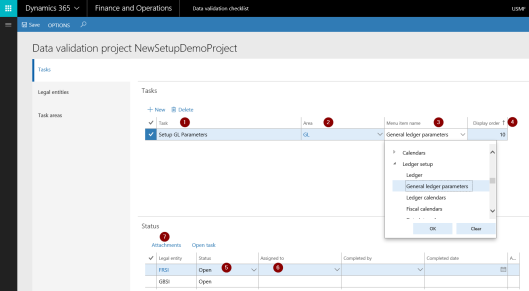
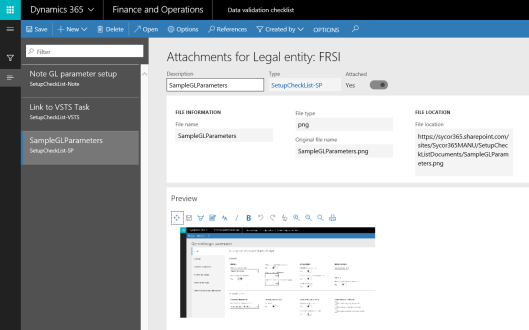
============== Inspired by a previous post of my follow MVP colleague Fredrik (see: https://dyntips.com/2017/08/02/data-...ion-checklist/) I decided to take a closer look at the data validation checklist functionality (a) for checking that all necessary system setups are made and (b) for establishing a data migration or cutover plan, which helps ensuring that nothing important is forgotten before going live with D365FO.  Once the project was created, I started with the setup of the task areas, which can be realized by opening the configuration menu shown next.  While setting up those task areas, I noticed that this setup can easily become a lengthy and time-consuming process. Luckily, D365FO ships with a handy Excel add-in that alleviates the setup of those task areas. For details, please see the following screenprint.   The task areas can be setup in numerous ways. I decided to use the different D365FO modules as my task areas. If you want to follow the same approach, you can download the attached SampleGoLiveChecklistTaskAreas Excel File and use it for importing the task areas in your environment. The task areas can be setup in numerous ways. I decided to use the different D365FO modules as my task areas. If you want to follow the same approach, you can download the attached SampleGoLiveChecklistTaskAreas Excel File and use it for importing the task areas in your environment.After the task areas are setup, the legal entities need to be specified …  … before the tasks can be setup. Setting up the data validation checklist tasks is the core of the data validation functionality. When setting up those tasks, you need to take the elements highlighted in the next screenprint into consideration. In the following, the highlighted elements will be explained in more detail.  No 1: Task Here you have to provide a task description that you can freely define. No 2: Area This field allows linking the tasks to the task areas that have been setup before. No 3: Menu item name The menu item name allows you establishing a link to the setup form. Once this link is established, users can directly jump to the form where they have to make their setup.  The menu item linkage functionality is probably the most important functionality of the data validation checklist because it allows users opening the respective setup form without a lengthy search in the D365FO menu structure. There is, however, a catch with this menu item linkage. The catch is that unless you know all of the different menu items by heart and can enter them directly through the Excel add-in, you have to select them manually, which is a very time consuming process. To help you with this setup, I attached you the different tasks and menu item in this file (SampleGoLiveChecklist) that can be downloaded and used as a starting point for your own data validation project. Please note that this file includes tasks for all except the retail and warehouse management modules. The menu item linkage functionality is probably the most important functionality of the data validation checklist because it allows users opening the respective setup form without a lengthy search in the D365FO menu structure. There is, however, a catch with this menu item linkage. The catch is that unless you know all of the different menu items by heart and can enter them directly through the Excel add-in, you have to select them manually, which is a very time consuming process. To help you with this setup, I attached you the different tasks and menu item in this file (SampleGoLiveChecklist) that can be downloaded and used as a starting point for your own data validation project. Please note that this file includes tasks for all except the retail and warehouse management modules. No 4: Display order The display order code allows defining how the tasks are sorted and displayed in the task list. No 5 & 6: Status & assigned to The status and assigned to fields allow tracking the progress and the person responsible for a specific task. No 7: Attachments The attachment functionality is another great feature that is incorporated into the data validation checklist. It allows attaching comments through notes, links – for example to VSTS backlog items – and files that can be used to document the setups that have been made.  If you downloaded and imported the sample task areas and sample tasks that I provided for download, you will get a task list similar to the one shown in the next screenprint.   MS PowerApps ships with a default connection to D365FO and allows establishing a connection to the tables that hold the data validation checklist tasks. MS PowerApps ships with a default connection to D365FO and allows establishing a connection to the tables that hold the data validation checklist tasks. After doing some tests with PowerApps, I feel that this and the other previously mentioned functionalities (work items, alerts, MS Flow) do not add much value but might rather complicate working on the different setup and configuration tasks. As a result, working directly on the data validation checklist seems – from the author’s perspective – the easiest and most efficient way. Hope you enjoyed reading this post and that you find the provided downloadable task areas and task Excel documents useful. Till next time. Filed under: Miscellaneous Tagged: checklist, Data validation, setup Источник: https://dynamicsax-fico.com/2017/12/...tup-checklist/
__________________
Расскажите о новых и интересных блогах по Microsoft Dynamics, напишите личное сообщение администратору. |
|
|
|
|
| Опции темы | Поиск в этой теме |
| Опции просмотра | |
|