Источник:
http://www.dynamicsaxtraining.com/fi...vendor-returns
==============
Introduction
In this training lesson we will study vendor returns. A company can return items to the vendor for various reasons, such as damaged products, expired products, wrong products, etc.
If a purchase order is financially update (i.e. invoiced), a vendor credit note should be created when items are returned to the vendor. There are two methods to create vendor credit notes:
- Create a purchase order with negative quantity
- Create a return order
Using any of these methods has the same effect as if the company would sell items to the vendor.
If the purchase order is only physically updated, the returned quantity can be reversed from the warehouse and then canceled. In this case, items are handled as if they are not received.
Create and Post Initial Purchase Order
Before we create a return order, we should have a purchase order. Let’s assume that the Purchase manager decides to purchase 100 units of the item 1607 from the 1102 vendor. I will use the same
demo data
- Go to Accounts payable > Common Forms > Purchase Order Details. The Purchase order form opens.
- Create a new purchase order clicking Ctrl+N. The Create purchase order form opens. Select the 1102 vendor in the Vendor account field. The Transfer vendor information box appears. Click Yes. Click OK. The purchase order header is created in the Purchase order form.
- In the Purchase order form, in the lines area select the 1607 item in the Item number field. The Site, Warehouse, Quantity, Unit, and Unit price fields are filled in automatically from the item setup. Set Delivery date to today. The Purchase order form has the following view:
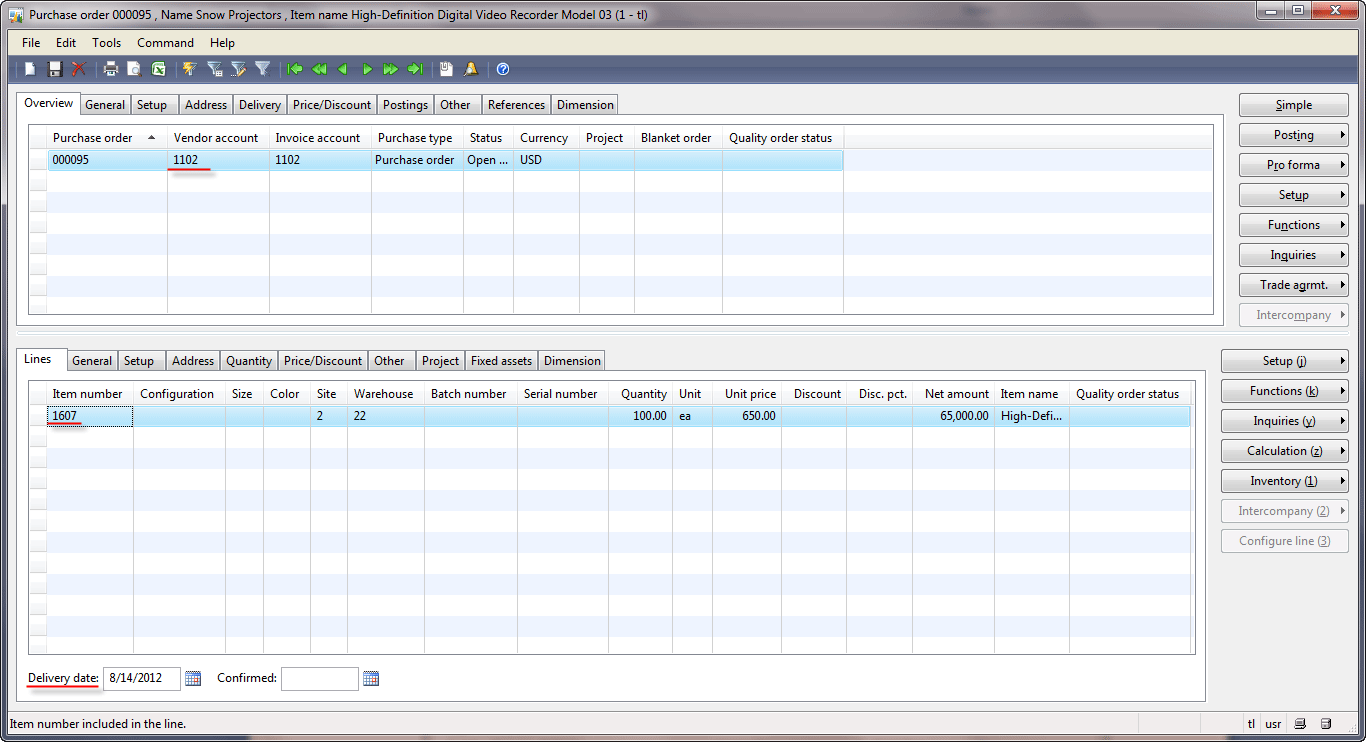 Purchase order form
- Before the Purchase manager can post an invoice, items should be received and registered in the warehouse. It is because the 1607 item has the warehouse management setup. The item arrival and registration flow are described in detail in this training lesson. We will quickly go through this flow.
- Go to Inventory management > Periodic > Arrival overview. The Arrival overview form opens. Select the Select for arrival check box for the created purchase order.
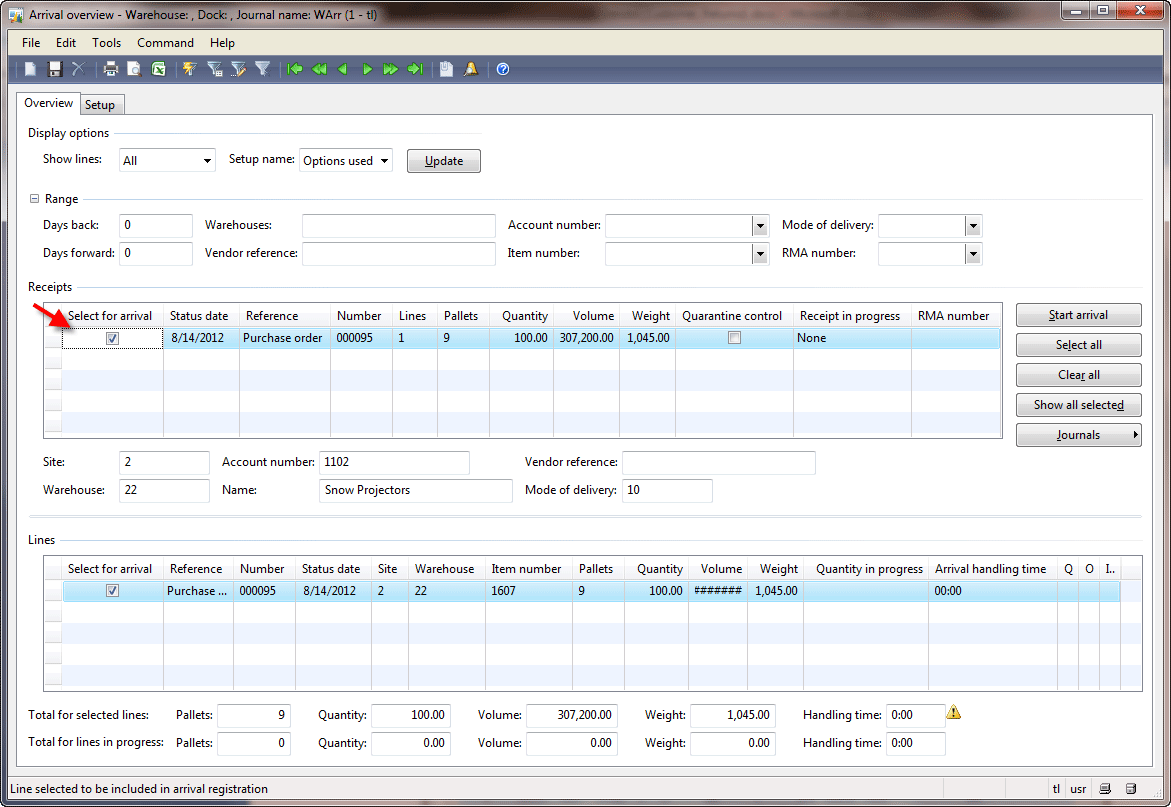 Arrival overview form
- Click the Start arrival button. An arrival journal is created. The “Journal 001689_117 of the type item arrival created” message appears. Double-click the message or go to Inventory management > Journals > Item arrival > Item arrival. The Location journal form opens, find the last arrival journal. Click the Lines button. The Journal lines form opens. Click the Functions > Pallet Id button for the first line and repeat this action for all lines. As a result, the Journal lines form will have the following view:
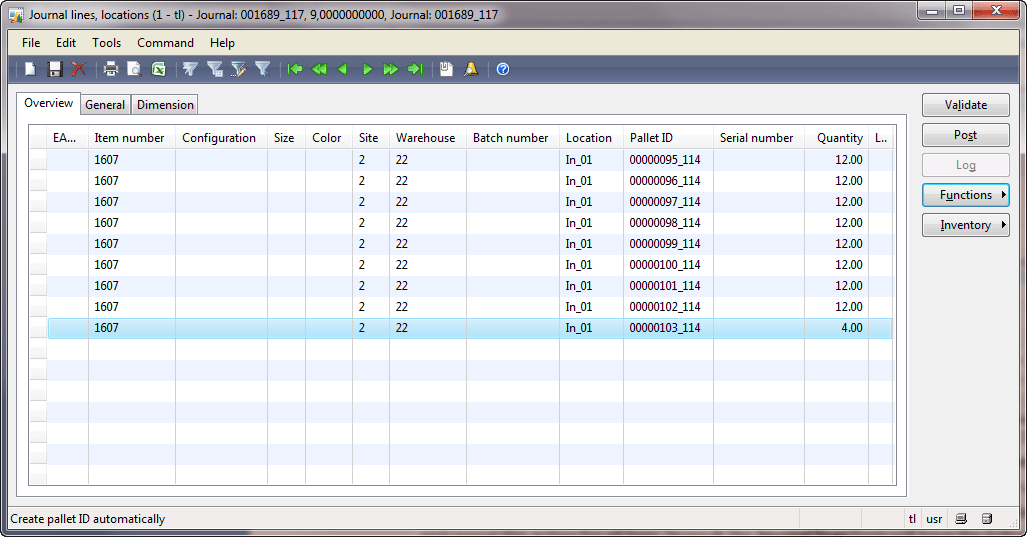 Journal lines form (Arrival journal)
- We can see that the total item quantity of 100 is divided by the pallet quantity of 12 items and the pallet numbers are calculated. The pallet quantity is set up on the item (Inventory management > Common Forms > Item details > find the 1607 item > Setup tab > Warehouse management field group > Pallet quantity field). Unfortunately, it is impossible to set up different pallet quantities for different pallet types. When we post the arrival journal, the system automatically finds the destination location and creates the pallet transport for each pallet. A pallet transport is an instruction to the forklift driver to deliver the item from the inbound dock to the destination location. Click the Post button in the Journal lines form. The “Journal has been posted” message appears.
- Pallet transports are created. When we finish, these transported items will be registered in the warehouse. Go to Inventory management > Common Forms > Pallet transports. The Pallet transportsform opens.
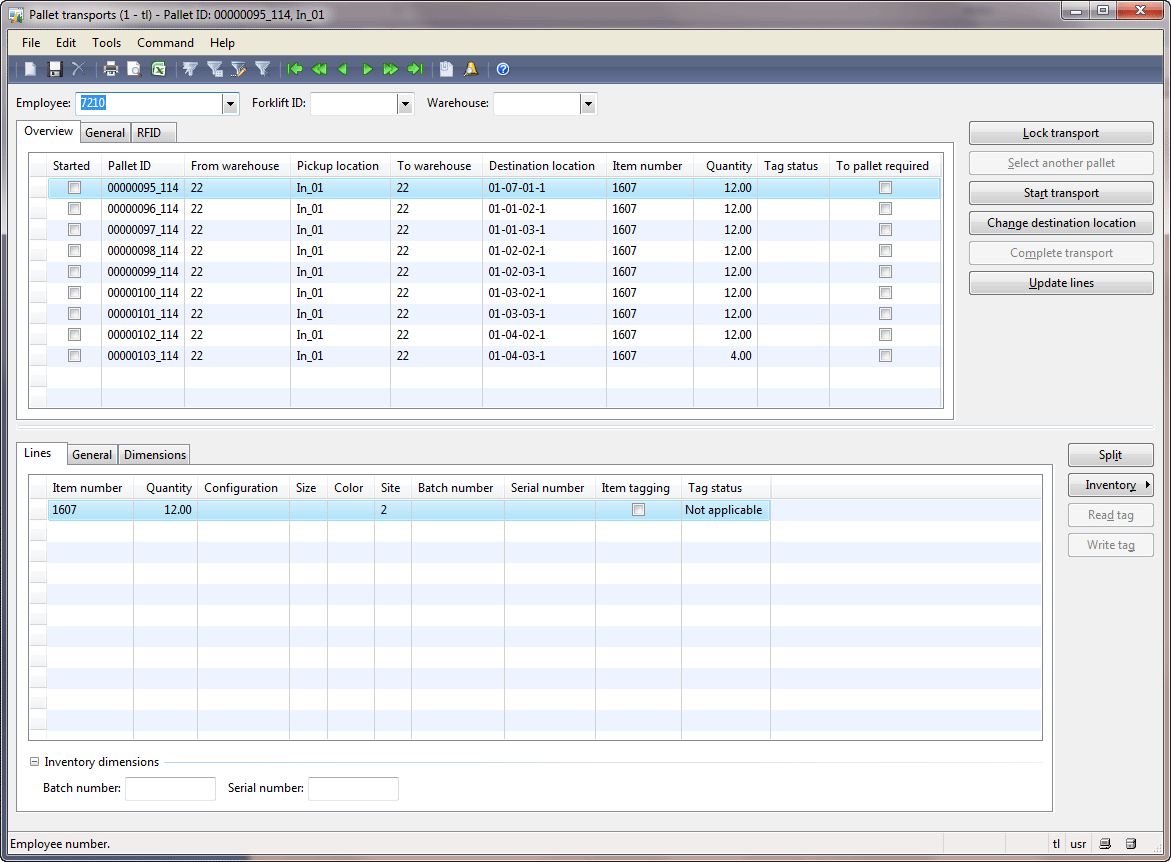 Pallet transports form
- Click the Start transport button. The Start transport form opens. Click OK. As a result of this operation, the Started check box in the Pallet transport form is selected. Now the Complete transport button is available. Click the Complete transport button. The pallet transport disappeared from the Pallet transport form. As a result, the items will be registered in the destination dimension (i.e. in a certain location on a certain pallet). (To check this, in the Purchase order form click the Inventory > Transactions button. The Transactions form will have the following view. If you don’t see some dimensions in the Transactions form, enable them with the help of the Inventory > Dimensions display button). Repeat this step from the beginning for all pallet transports.
- Now we can post a packing slip. We assume that we have received the packing slip document from the vendor. We sign this document and update the purchase order. The packing slip document guarantees that we received items (they became our property). In the Purchase order form, click the Posting > Packing slip button. The Posting packing slip form opens. Enter some numbers in the Packing slip field, for example 223. In the Quantity field, select the All value and click OK.
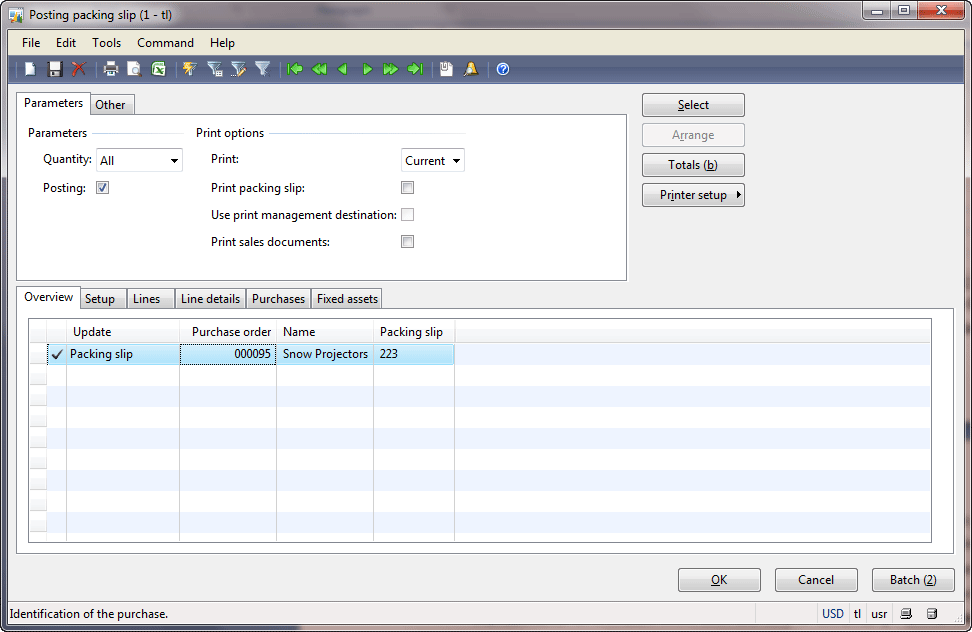 Posting packing slip form
The purchase order is packing slip updated. (Since I have used the clear demo data, the “Period 8/15/2012 is not open” error message appears. Read the «Packing slip» chapter from the Financial article to set up new periods). If we open inventory transactions, we will see that the receipt status changed from Registered to Received: in the Purchase order form, click the Inventory > Transactions button. The Transactions form will have the following view.
- Now we can post an invoice. We assume that the vendor sends us the invoice and we will sign it. The invoice document guarantees that the Company will pay for the delivered items. Click the Posting > Invoice button. The Posting invoice form opens. Fill in the Invoice field with, for example, the 223-i value (this value is taken from the invoice document sent by the vendor) and click OK. The invoice will be posted.
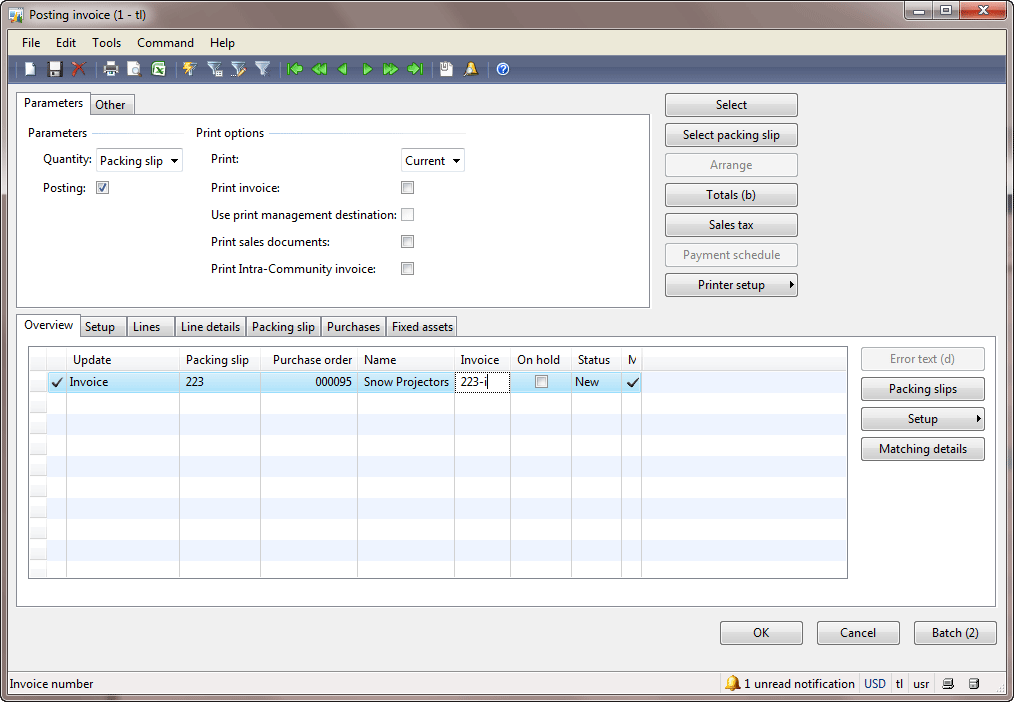 Posting invoice form
If we open inventory transactions, we will see that the receipt status changed from Received to Purchased: in the Purchase order form, click the Inventory > Transactions button. The Transactions form will have the following view. The general ledger transactions are also generated since the company agrees to pay for the delivered items. In the Purchase order form, click the Inquiry > Invoice. The Invoice Journal form with one invoice journal opens. Click the Voucher button to see the general ledger transactions. The Voucher transactions form has the following view.
We have purchase 100 items from the 1102 vendor. Let’s check that these items are available in the warehouse. In the
Purchase order form, click the
Inventory >
On-hand button. We make sure that the items are in the warehouse.
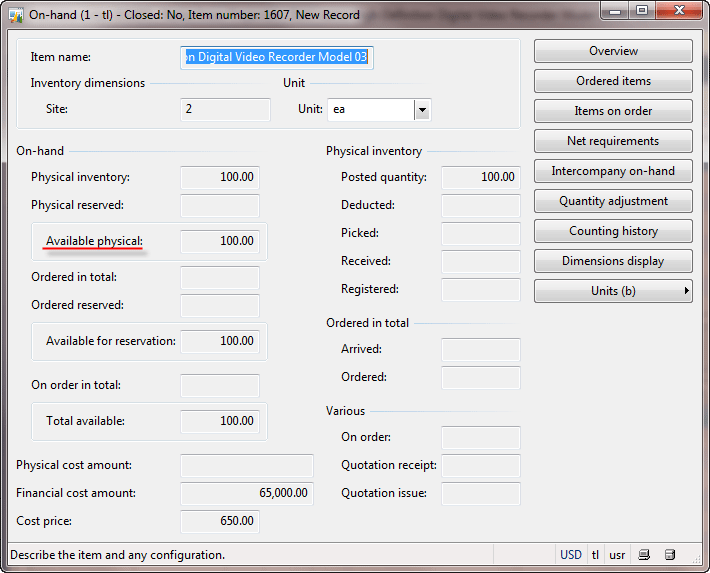
On-hand form
To view the availability by dimensions, click the
Overview button. If some dimensions are omitted, enable them by clicking the
Dimensions display button.
Now we can create a return order.
Purchase Order with Negative Quantity
This method is used when no reference to a specific purchase order or a Return Merchandize Authorization number is required. In other words, the company can return any items to the vendor without any negotiation or notification.
Let’s assume that the Inventory Manager accidently found that 10 items of the 1607 item are broken. The Inventory Manager notifies the Purchase Manager about this issue. The Purchase Manager decides to return the broken items to the vendor.
To return the broken item, the Purchase Manager should know the vendor who delivered those items and the dimension where the items are stored (i.e. warehouse, location, and pallet). The dimension is received from the Inventory Manager. To find the vendor record, the Purchase Manager should find the purchase order for the broken items. But, usually one item type is purchased from one vendor in this type of return. So we assume that the Purchase Manager knows that the 1607 item is always purchased from the 1101 vendor. The purchase order number can be found from inventory transaction for the broken items (Transactions form > General tab > Reference field group > Number field).
The Purchase Manager asks the Inventory Manager about the dimension where the broken items are found. Let’s check what dimensions are used to store the purchased items. Open the
Purchase order form if it was closed and find the created purchase order. In the line area, click the
Inventory >
Transactions button. The
Transactions form opens. Activate the
Pallet and
Location dimensions by clicking the
Inventory >
Dimensions display button. In my case the
Transactions form will have the following view:
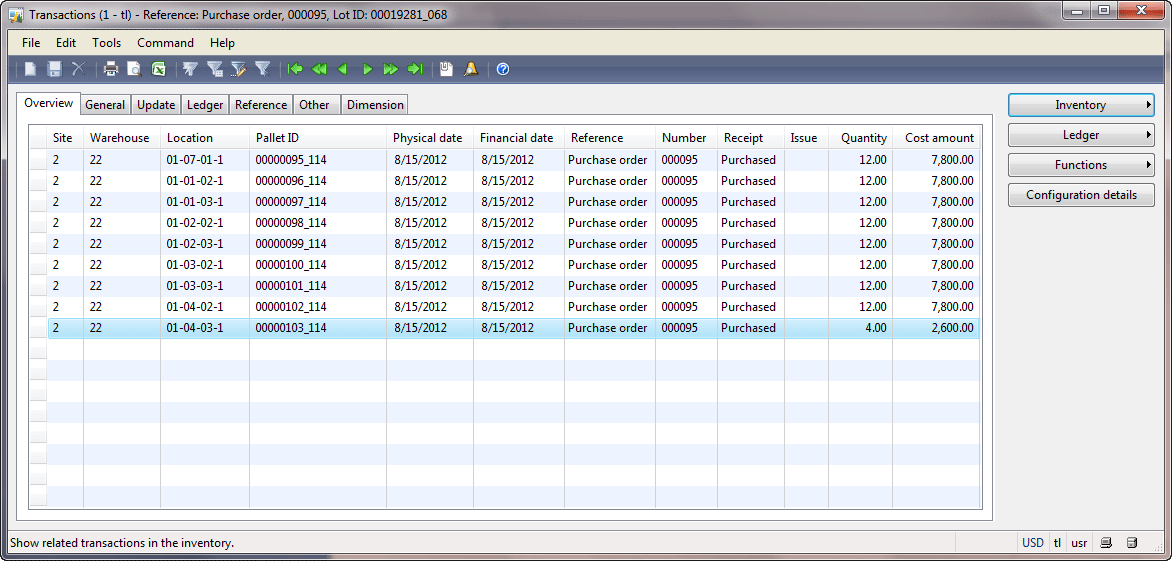
Transactions form (Purchased)
In this form, we can see the dimensions where the items were stored. We assume that the Inventory Manager finds 10 broken items in the 01-01-03-1 location, 00000097_114 pallet. Let’s return these items to the vendor. Note that we cannot specify exact items to return because the 00000097_114 pallet has more than 10 items (it contains 12 items). To specify the exact item, an additional Number Sequence dimension should be activated for the item. In this case each item on the pallet will have a unique number. The 1607 item uses the N-WLP dimension group (
Inventory management >
Common Forms >
Item details > Find the 1601 item >
General tab >
Dimension group) that doesn’t have the Number Sequence dimension active. In this case we assume that during the picking process the warehouse worker finds the broken items on the pallet by himself.
Let’s return the broken item to the vendor. First of all, the return order should be created (a purchase order with negative quantity):
- Go to Accounts payable > Common Forms > Purchase order details. The Purchase order form opens.
- Create a new purchase order (pressing Ctrl+N). The Create purchase order form opens, select the 1102 vendor in the Vendor account field. The Transfer vendor information dialog box appears. Click OK. Click OK. The purchase order header is created.
- In the purchase line area, create a new line with the following values:
- Item number = 1607
- Quantity = -10
Note that the Site, Warehouse, Unit, Unit price, and Net amount fields are filled in automatically.
- Save the line. The “You are creating a credit note for a vendor with a configured cash discount code” message appears. Close it. A cash discount is used during the payment and as usually is not set up on the return orders. Because if we return items, we want to receive all the money back. A cash discount on a return order means that if the vendor returns the money during a certain period, he receives a discount (i.e. returns less money for the broken items).
The
Purchase order form will have the following view:
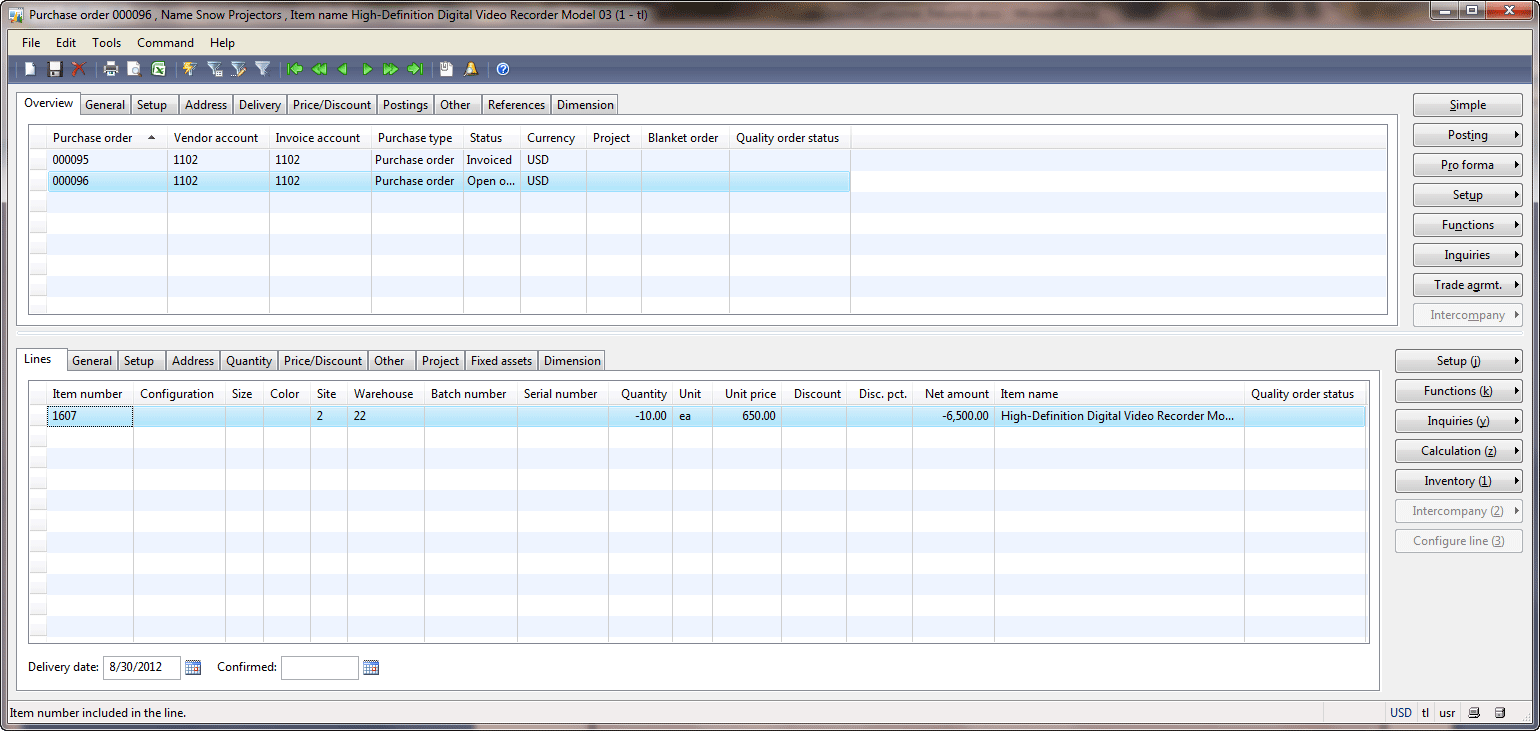
Purchase order with negative quantity
Returning an item to a vendor is handled like selling items from the inventory to the vendor, to whom the items must be returned. The sales flow for the warehouse management items consists of the following steps: post a sales confirmation, create an output order, create a shipment, assign the output order to the shipment, automatic reservation of the sold items, create a picking route, complete a picking route, post a packing slip, and post an invoice (This flow is described in detail in
this training lesson).
Unfortunately it is impossible to use the warehouse management features for the returned items. I mean the following: an output order, a shipment, automatic reservation, and a picking route. It is because during the shipment process, items are reserved automatically according to the shipment reservation combination (
Inventory management >
Setup >
Distribution >
Shipment reservation combination). But, the returned items are stored in a certain dimension (i.e. warehouse, location, and pallet) and can be reserved according to the shipment reservation combination. The dimension for the returned item must be set up manually, because Microsoft Dynamics AX doesn’t know where the broken items are stored.
Post Return Order
We have created the return order. In this topic we will go through the main steps of a return order posting and analyze the results.
Note that the flow below is used for all types of return orders (i.e. a purchase order with negative quantity or a return order) and for an item with or without warehouse management setup.
- In the Purchase order form, in the lines area, click Inventory > Reservation. The Reservation form opens. Enable the dimensions in this form by clicking Inventory > Dimensions display button > Select Warehouse, Location, and Pallet dimensions > click OK.
- Find the dimension where the broken items are: 01-01-03-1 location, 00000097_114 pallet.
- Fill in 10 in the Reservation field. Save the line. 10 items in this dimension will be reserved. Note that this dimension has 12 items (10 broken and 2 good). Since we can’t reserve specific items, the Warehouse Worker should be careful when selecting items from this dimension for the return order (he or she should select only the bad items). Note that if it is required to reserve specific items, the Serial number dimension must be enabled for this item through the inventory dimension group. The Reservation form will have the following view:
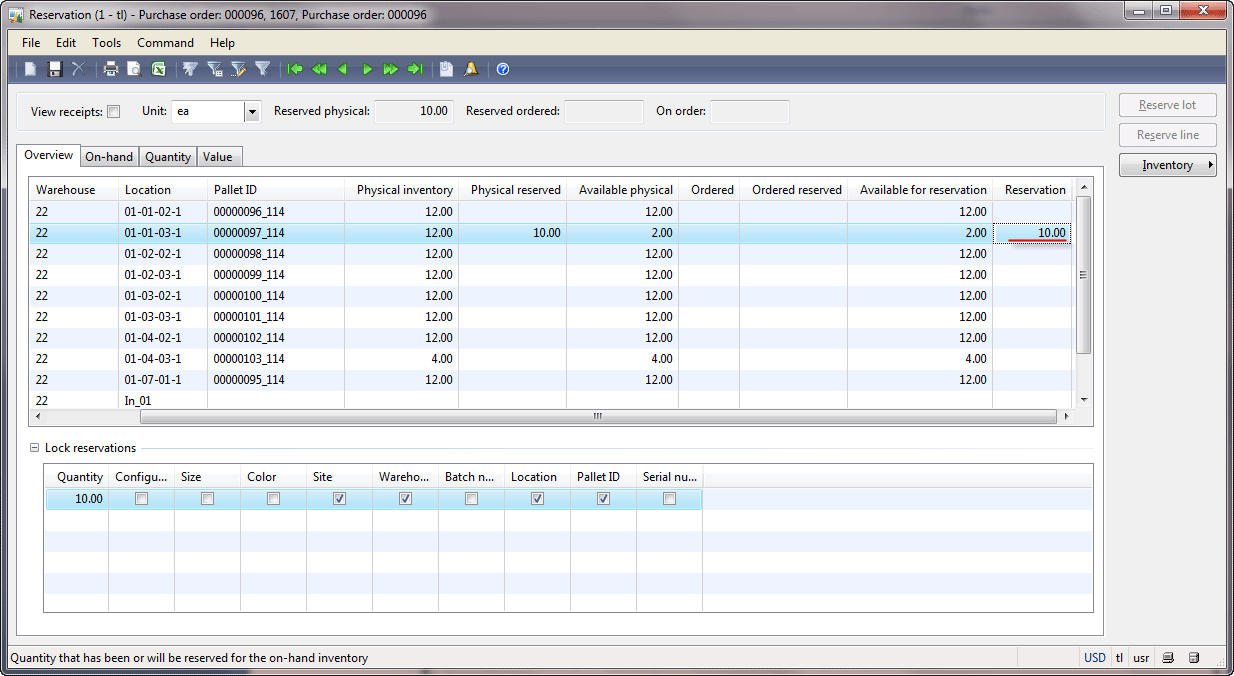 Reservation form
- Please make sure that the items are reserved. In the lines area of the Purchase order form, click the Inventory > Transactions button. The Transactions form opens. We can see that an inventory transaction with the status Reservedis available. Just for information:
- The Reserved physical status means that the reserved qty is physically available in the dimension.
- The Reserved ordered status means that the quantity is reserved but the dimension doesn’t contain the required items. When items will be transferred to the dimension, the status will be update to Reserved physical.
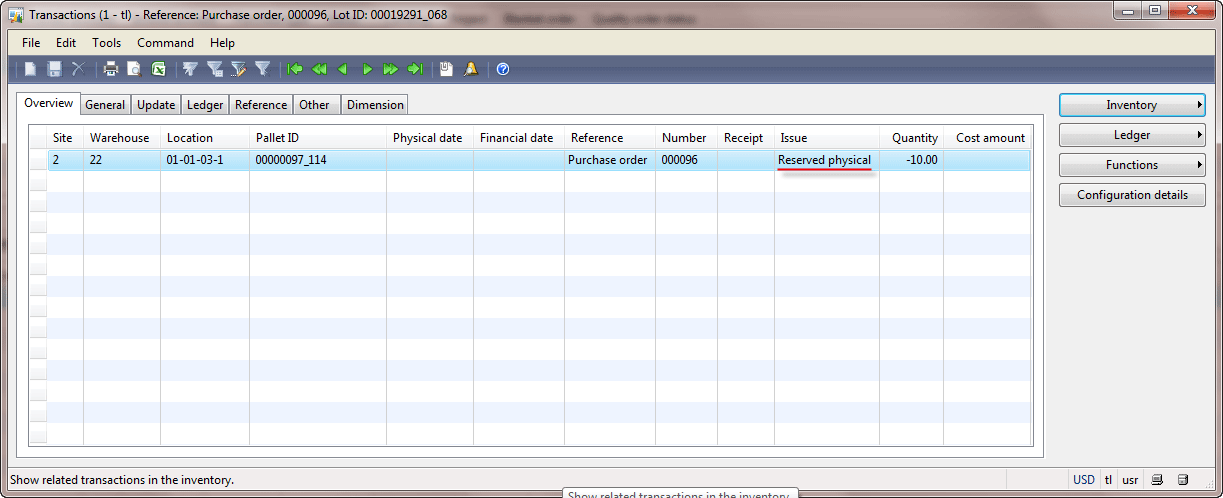 Transactions form (Reserved)
- Unfortunately, it is impossible to create a picking task for a purchase order line (or for an output order that can be created for the purchase order line). So, we cannot use the Picking form (Inventory management > Common Forms > Picking routes). We assume that the Purchase Manager calls the Warehouse Worker and asks him to perform the picking task: pick the broken items from a specific location and pallet, transfer the broken items to the outbound location, and inform the Purchase Manager about the operation being completed. The Warehouse Worker receives this in an informal form from the Purchase Manager, because we can’t create the picking instruction document in Microsoft Dynamics AX for the returned items. When the Warehouse Worker completes the picking task and informs the Purchase Manager, she or he does the following: in the lines area of the Purchase order form, click the Inventory > Pick button. The Pick form opens. Click the Auto-create check box. As a result, a new line appears in the Pick now area.
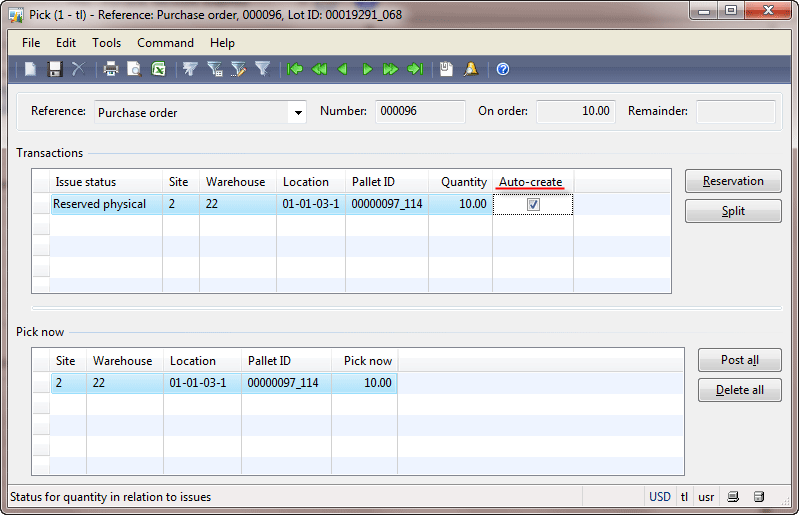 Pick form
Click the Post all button. The items will be updated to the Picked status.
- Please make sure that the items are picked. In the lines area of the Purchase order form, click the Inventory > Transactions button. The Transactions form opens. We can see that the inventory transaction status is updated from Reserved to Picked.
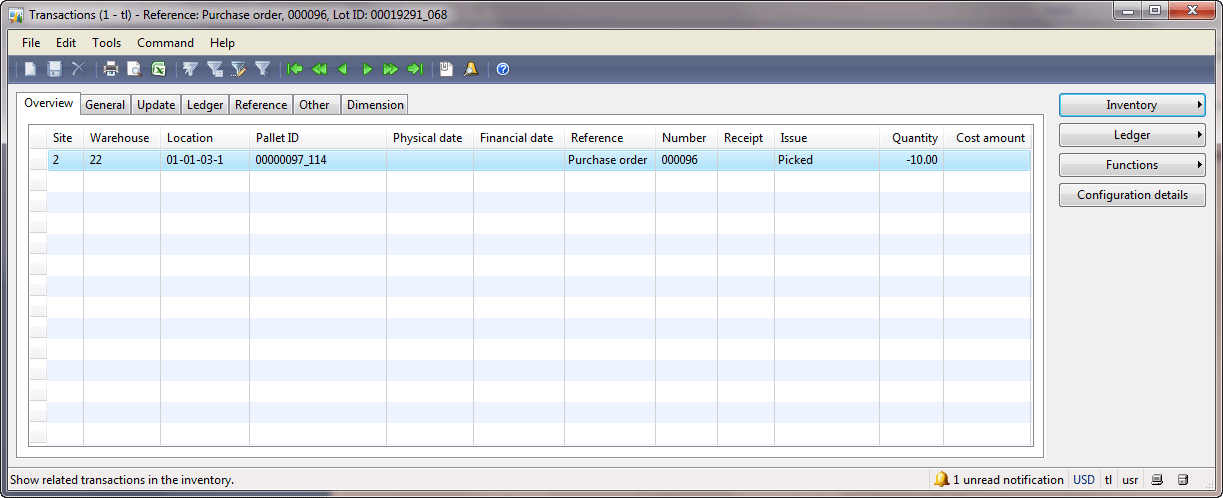 Transactions form (Picked)
Note that in the system we don’t record where the warehouse worker delivers the broken items to. The Microsoft Dynamics AX only knows that the broken items were picked from a certain dimension. Also, we will not specify in which vehicle the broken items will be delivered from the warehouse gate to the vendor. Vehicle or truck management is not implemented in Microsoft Dynamics AX 2009. Each pallet contains information about the location where the pallet is. But the pallet location is only updated when the Pick form is used. So if we go to Inventory management > Setup > Inventory equipment > Pallets > find the 00000097_114 pallet, the Location field will contain the 01-01-03-1 location not the outbound location.
- We assume that the items are loaded to the truck and delivered to the vendor. When the items are delivered, the Purchase Manager posts, prints, and sends the Packing slip document for the vendor to sign. The packing slip document is a guarantee that the vendor receives the broken items. In the Purchase order form, click the Posting > Packing slip button. The Posting packing slip form opens. Enter a packing slip number, for example “Return 1” and click OK. The packing slip is posted.
- Please make sure that the items are deducted from the warehouse. In the lines area of the Purchase order form, click the Inventory > Transactions button. The Transactions form opens. We can see that the inventory transaction status is updated from Picked to Deducted.
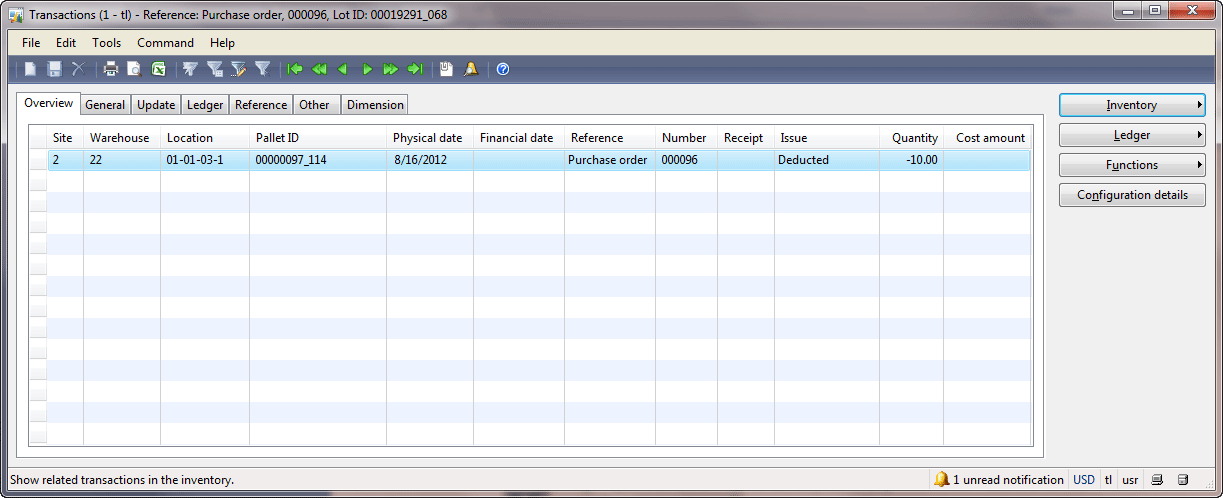 Transactions form (Deducted)
- The Purchase Manager posts, prints, and sends the invoice document for the vendor to sign. This document confirms that the vendor must pay (return) some amount of money for the broken items. In the Purchase order form, click the Posting > Invoice button. The Posting invoice form opens. Fill in the invoice number, for example, “Inv Return 1” to the Invoice field. Click OK. The invoice is posted.
- Please make sure that the items are sold from the warehouse. In the lines area of the Purchase order form, click the Inventory > Transactions button. The Transactions form opens. We can see that the inventory transaction status is updated from Deducted to Sold.
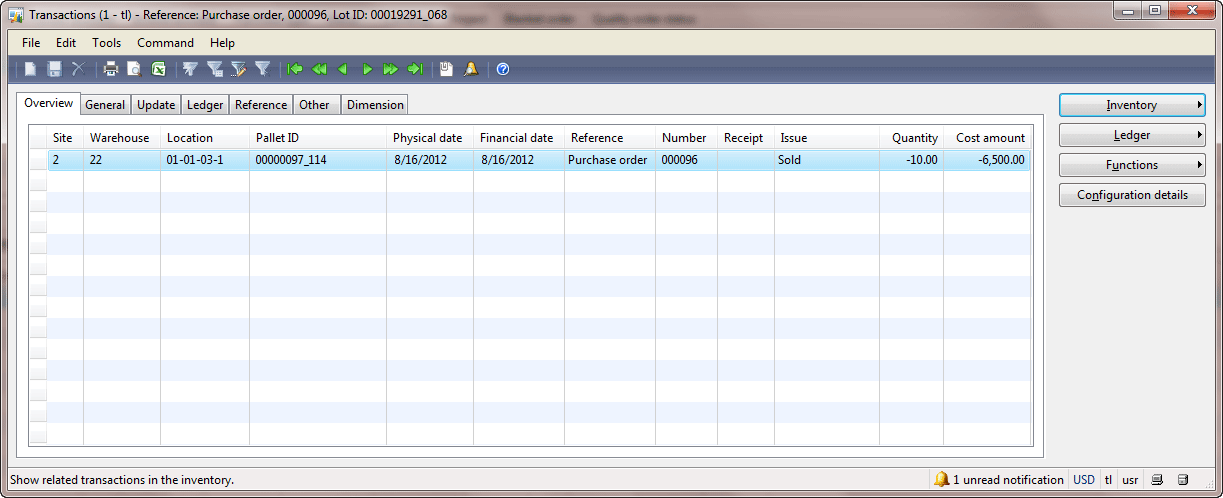 Transactions form (Sold)
Note that the invoice document has the “Credit note” title. Print the invoice to the screen to check it:
Purchase order form >
Inquiries menu button >
Invoice button > the
Invoice Journal form opens >
Preview/Print menu button >
Original preview button. The invoice has
the following view.
To view the general ledger transactions that were generated during the invoice step, click the
Voucher button in the
Invoice Journal form.

Voucher transactions form
Transactions for the 211250 and 142100 general ledger accounts are the reverse ones for the packing slip transactions. (You can view the voucher for the packing slip and make sure that the opposite transactions are there.) The transactions have the following view:
211100 (Accounts payable account)
140320 (Inventory, receipt account)
Debit
Credit
Debit
Credit
6500
6500
The above transaction decreased the Accounts payable account (it is good so the debit part is used) and decreased the Inventory account (it is bad so the credit part is used). In other words, the company debt to the vendor is decreased and the Inventory is also decreased because we returned the items. For more information, see the
Financial training.
The Accounts payable account is taken from the vendor posting profile:
Accounts payable >
Setup >
Posting profiles > GEN posting profile (because it is set up in
Parameters form) >
Setup tab >
Summary account field.
The Inventory account is taken from the inventory posting profile:
Inventory management >
Setup >
Posting >
Posting >
Purchase order tab >
Receipt radio button > Item relation = DVR (because 1607 item belongs to the DVR inventory group) >
Account number field.
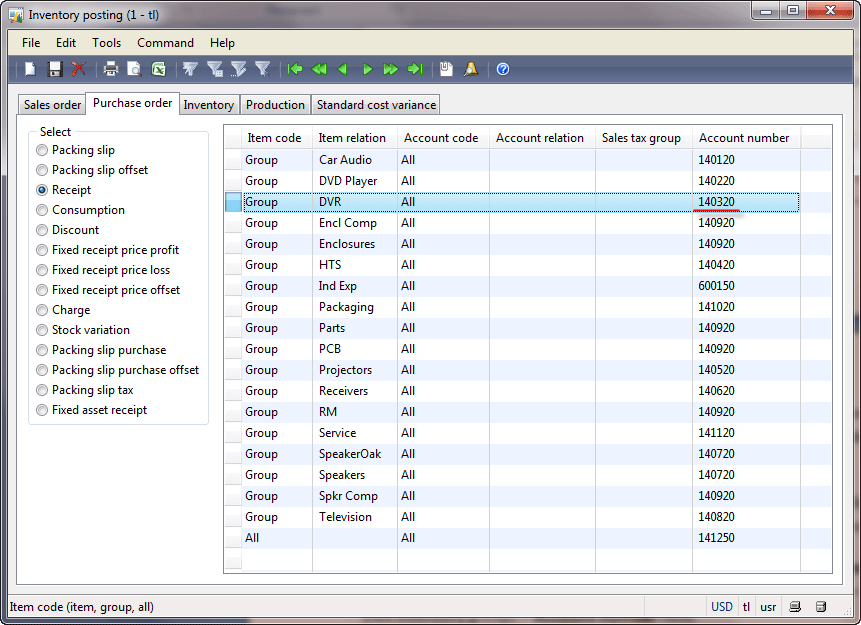
Inventory posting form
The
Vendor transaction is also generated. Let’s check the vendor transactions. Go to
Accounts payable >
Common Forms >
Vendor Details > the
Vendors form opens > find the 1102 vendor. Click the
Transactions button. The
Vendor transactions form has the following view:
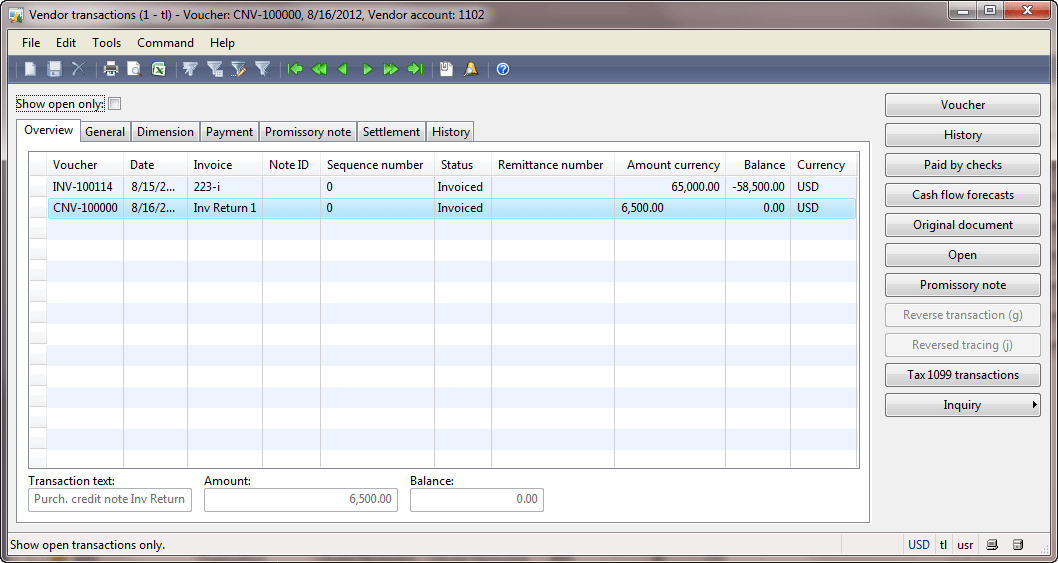
Vendor transactions form
We can see that there are two vendor transactions – one generated from the purchase order and another from the return order.
Payment from Vendor
The vendor should return the money for the broken items if the company pays for the delivered items. In this case the payment journal should be used. The vendor payment journal is used in a standard way to post the payment
from the vendor as described in
this training lesson. The only difference will be in a transaction – the Bank account will be debited and the Vendor account will be credited,
see example.
If the company hasn’t paid for the delivered items than the payment amount can be decreased. That is the amount for the broken items will be excluded from the payment to the vendor.
In our case the company should pay $65 000 for the delivered items (see the purchase order). But since several items for the amount of $6 500 were broken (see the return order), the company can decrease the payment amount for the vendor. As a result, the company can pay the vendor $65 000 – $6 500 = $58 500. In Microsoft Dynamics AX settlement is used for this purpose.
Payment to Vendor
Now the company pays for the delivered items. We will check how settlement works. Let’s create a payment to the vendor. You can find additional information about the payment process in
this training lesson.
- Go to Accounts payable > Journals > Payments > Payment journal. The Journal form opens.
- Create a new line. Select “APPay” in the Name field. Save the line.
- Click the Lines button. The Journal voucher form opens.
- Click the Payment proposal > Create payment proposal button. The Vendor payment proposal form opens. Click OK. The Vendor payment proposal form will have the following view:
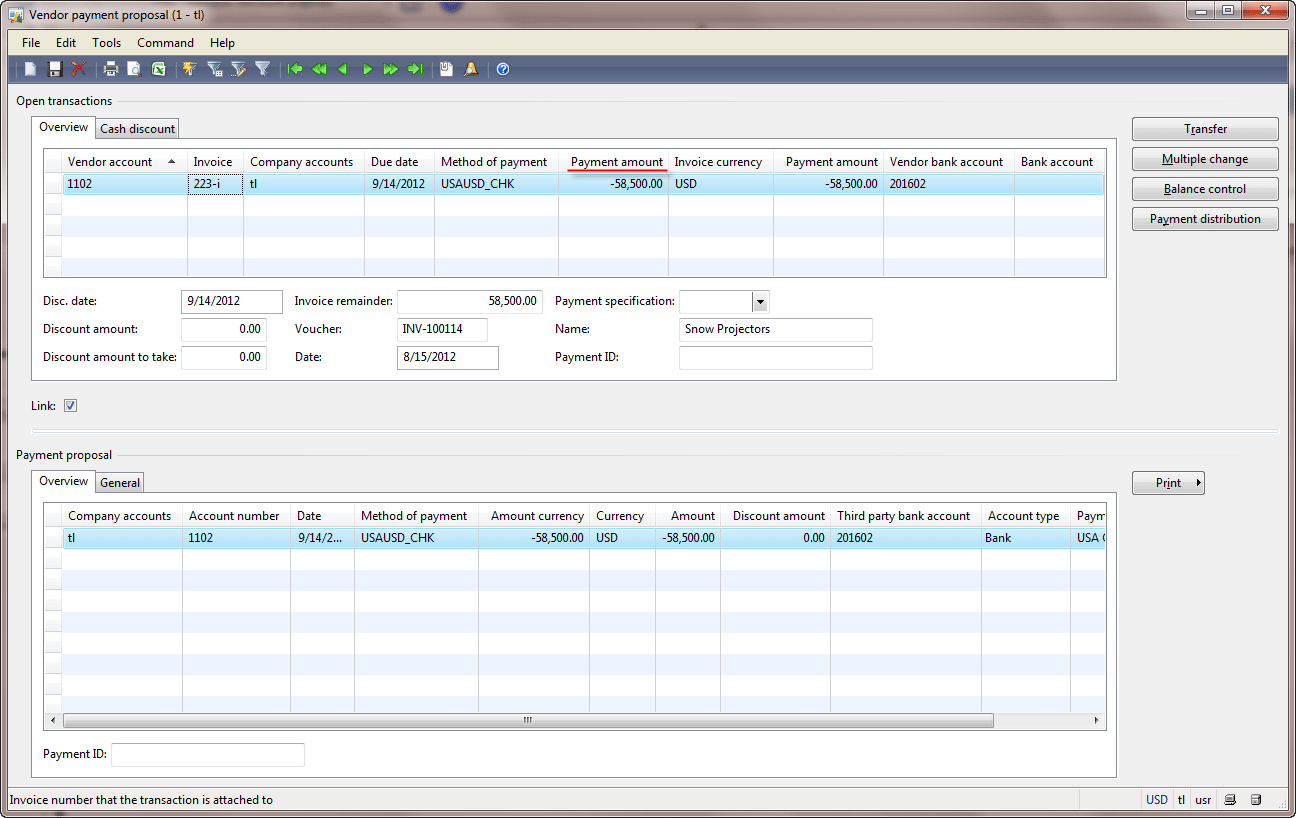 Vendor payment proposal form
We can see that the sum for the broken items was already deducted from the payment amount. Click the Transfer button. The Transfer payment proposal to journal dialog opens, click OK.
- The Journal voucherform will have the following view:
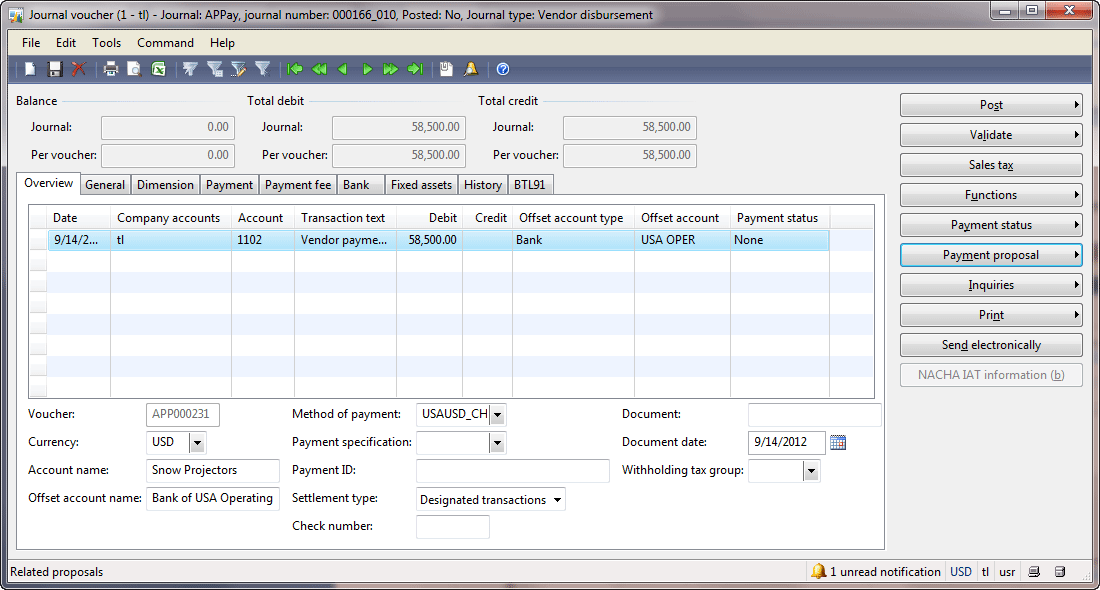 Journal voucher form (Payment)
The amount is decreased because Microsoft Dynamics AX automatically settles vendor transactions from the purchase and return orders. Settled amount means that the amount is closed, i.e. paid.
Go to
Accounts payable >
Common Forms >
Vendor details > find the 1102 vendor. If we click the
Balance button, we see that the vendor’s open balance is $58 500:
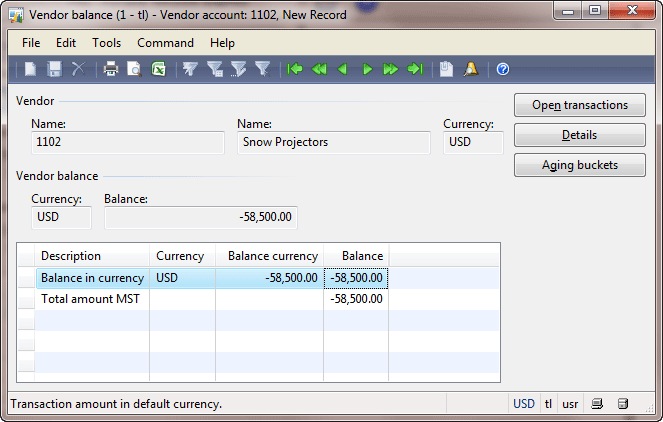
Vendor balance form
To view closed (settled) transactions, click
Functions >
Closed transaction editing. The form that opens will have the following view:
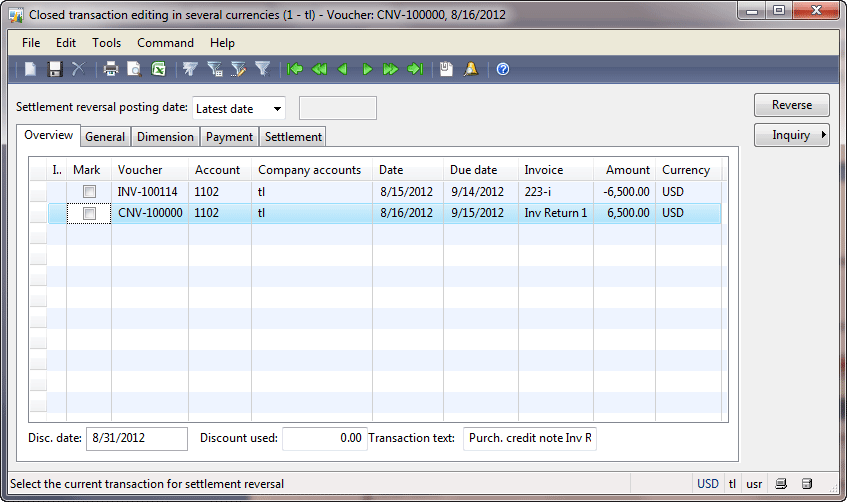
Closed transaction editing form
We can see that part of the invoice transaction is settled with the credit note transaction. (If you click the
Mark check box for one transaction, the settled transaction will be marked automatically.)
If we review the open vendor transaction, we will only find part of invoice transaction. Click the
Function >
Open transaction editing.
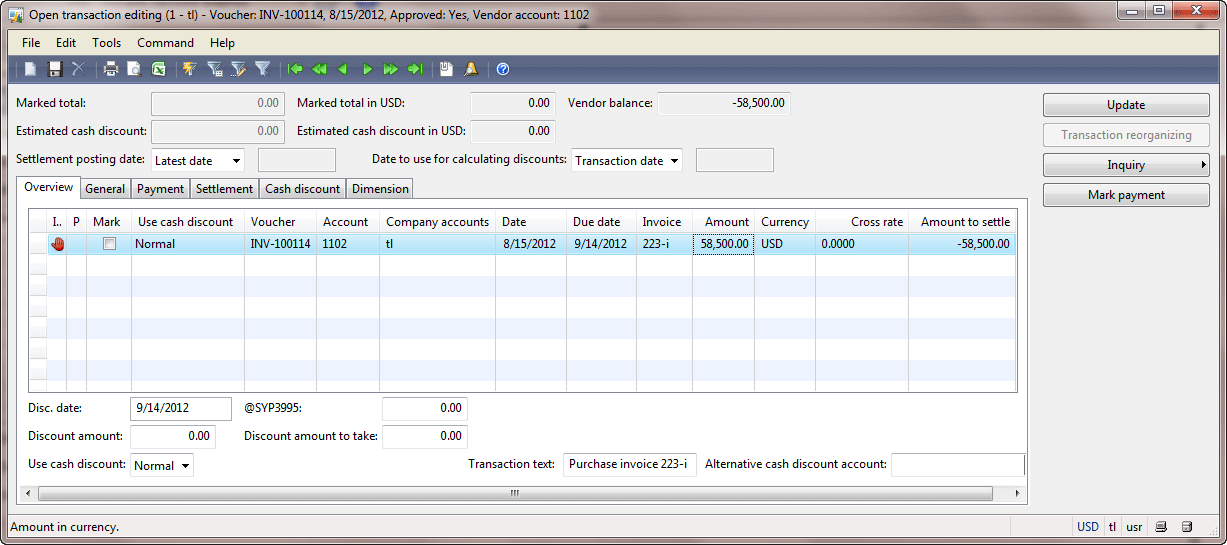
Open transaction editing form
Note that automatic settlement is set up under Accounts payable > Setup > Parameters > Settlement tab > Settlement field group > Automatic settlement check box. If automatic settlement is cleared, then settlement can be created manually with the help of the
Open transaction editing form. If settlement is not created, the company should pay $65 000 for the delivered items and the vendor should pay (the return payment) $6 500 for the broken items.
We assume that the vendor receives our payment, so we can post the payment journal.
- Go to Accounts payable > Journals > Payments > Payment journal. The Journal form opens.
- Find the created journal and click the Lines button. The Journal voucher form opens.
- Click the Post > Post button.
We already say that the cash discount is not used for the return order. In case the cash discount is used, the vendor returns less money for the broken items. For example if return order has the following cash discount – pays during 3 days receives 5% discount. The vendor can only pay 95% for broken items.
Speed Up the Creation of a Return Order
We have studied how to create a return order with the help of a purchase order and negative quantity. The disadvantage of this method is that we manually set up a broken item with dimensions, unit price, remove the cash discount, find the vendor and have no reference between a purchase and a return order. In Microsoft Dynamics AX, it is possible to create a return order on the basis of a purchase order. We should only know the vendor account and the purchase order number.
- Create a new purchase order. Go to Accounts payable > Common Forms > Purchase order details. The Purchase order form opens. Click Ctrl+N. The Create purchase order form opens, select the 1102 vendor in the Vendor account field. The Transfer vendor information dialog box appears. Click OK. Click OK. The purchase order header is created.
- In the header area of the Purchase order form, click Function > Create credit note button. The Create credit note form opens.
- For example another 3 items were broken. Select the purchase order with the purchased item. In the line area, fill in 3 in the Quantity field. Unfortunately, we can’t specify the location and pallet dimensions for the broken items on this step (We should do this manually with the help of the Reservation form). Click OK.
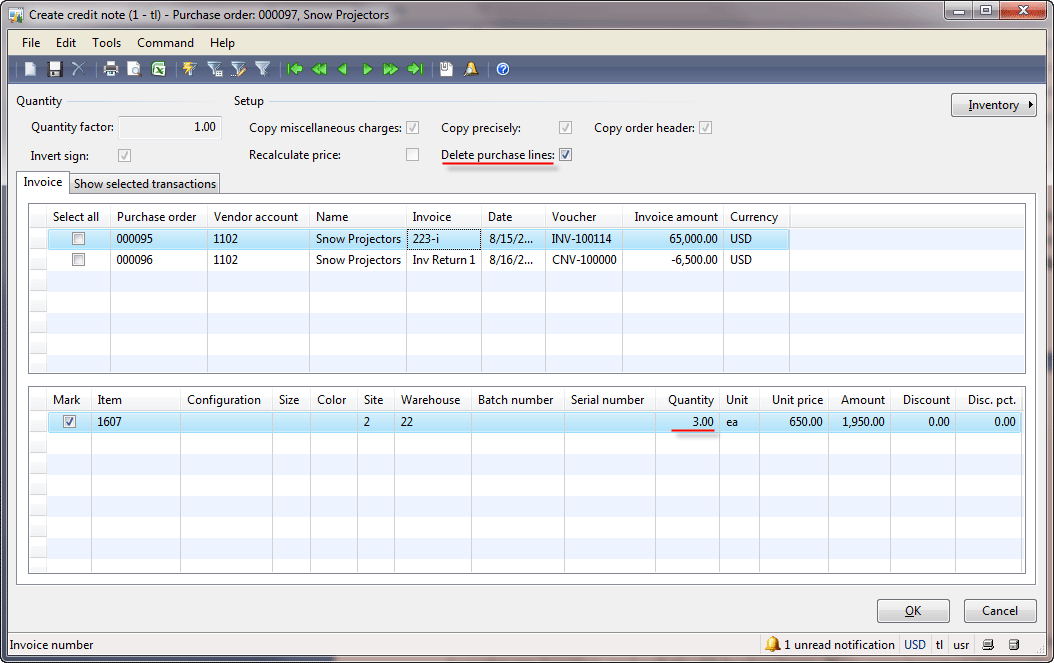 Create credit note form
- The purchase order line will be created with the correspondent item, dimensions, quantity, and unit price.
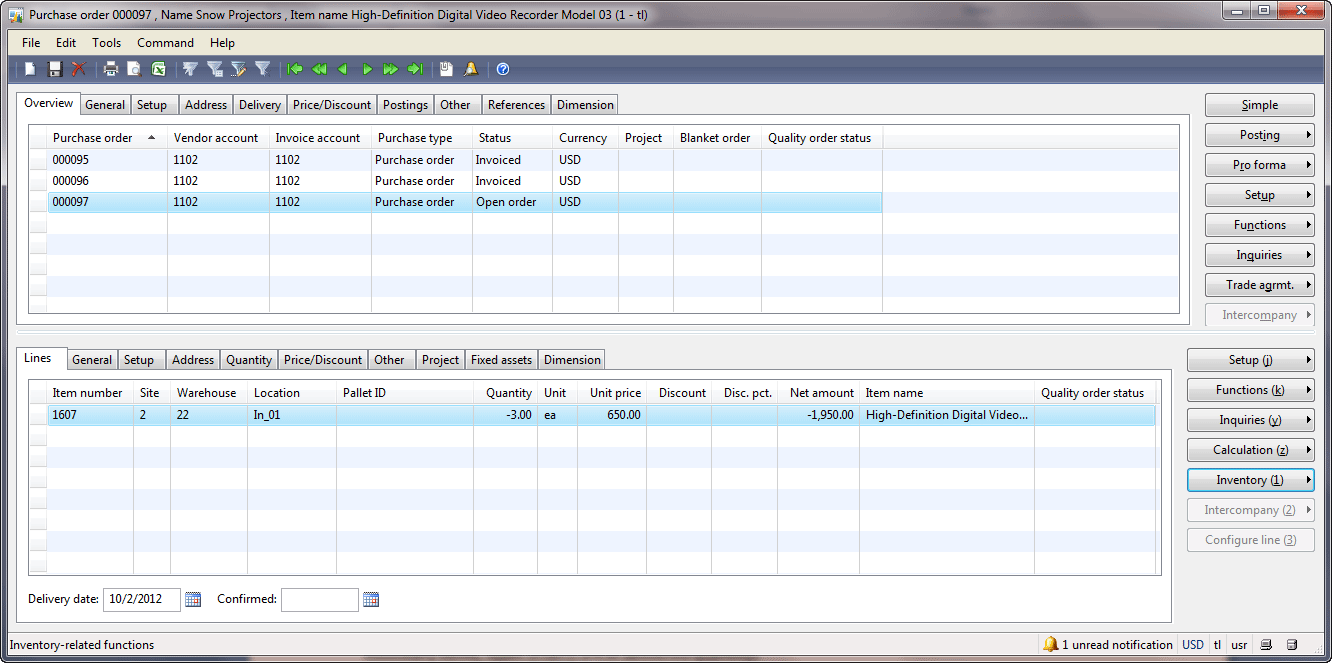 Purchase order form
Microsoft Dynamics AX also automatically reserves the item in the warehouse and marks (settles) an inventory transaction from the purchase and return order. Unfortunately, we can’t set up the broken item inventory dimensions (pallet, location) in the Create credit note form. So Microsoft Dynamics AX automatically reserves and marks the first 3 items from the warehouse. If we click the Inventory > Marking button, the marking will be shown.
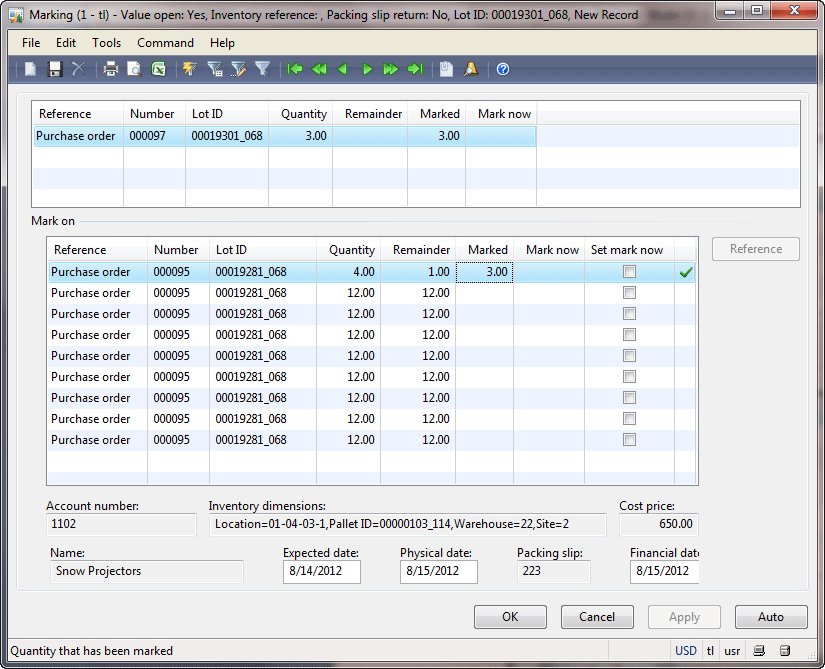 Marking form
Automatic marking selects the first 3 items from the inventory. But the broken items can be in another dimension, so manual unmarking and marking should be done (during the unmark process the items are also unreserved automatically).
Then, the purchase order with negative quantity is handled in the same way as we have studied.
We can add as many return order lines as it is required with the help of the
Create credit note form. In the lines area of the
Purchase order form, there is the
Function >
Create credit note button. This is the same functionality as we have discussed. The only difference is that by default the
Delete purchase line check box is cleared. If this check box is cleared, new line(s) will be added to the return order, if it selected – the lines will overwrite the return order lines.
Return Order Type
In Microsoft Dynamics AX, a purchase order with the Return order type can be created. Open the
Purchase order form. Create a new line. The
Create purchase order form opens. Select the 1002 vendor and transfer the vendor information. Then select the
Return order type.
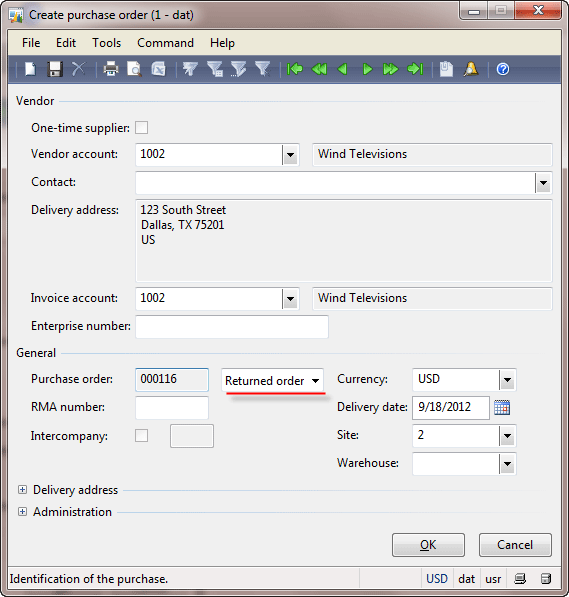
Create purchase order form
The difference between the purchase order and return order types is in additional validation. The workflow for the return order type is the same as we have studied.
First of all, you can’t create a return order without an RMA number specified. In the
Create purchase order form, click
OK button. The “RMA number is not filled in” error message will be shown. The RMA number is received from the vendor. Fill in any value, for example
111 and click
OK. The return order will be created.
In the lines area, select, for example, the 1001 item, configuration = HD, size = 37, color = 01 and save the line. In the
Quantity field, write
100 and save the line. The “Quantity of returned items orders must be negative” error message will be shown – it is another validation.
You can create lines manually or with the help of the
Functions >
Create credit note button.
Return Uninvoiced Items
What can we do when we receive items and find that some of them are broken? We can refuse to receive them. In this case we post a packing slip with the received quantity only. Refused quantity is still ordered. The company assumes that the vendor sends the items again to fulfill the order. In this case we can say that the purchase order is a back order. If the company decides to cancel the refused quantity, use the following functionality in Microsoft Dynamics AX:
Purchase order > select line >
Functions menu button >
Deliver reminder button.
For example:
- Create a new purchase order for the 1002 vendor.
- Create a new line
- Item = 1001
- Configuration = HD
- Size = 37
- Color = 01
- Quantity = 100
- The vendor delivers 100 items, but 20 of them are broken and we refuse to accept them. We post only 80 items in the system. Click Posting > Packing slip > in the Parameter field group select the All value in the Quantity field > fill in 123 in the Packing slip field > go to the Lines tab > fill in 80 in the Update field > click OK. The items will be posted as received. Note that the 1001 item does not use the warehouse management so it is not required to go through the arrival and registration process.
- To check the posting result, go to the Quantitytab. We can see that 80 items are received and 20 remain ordered (backordered).
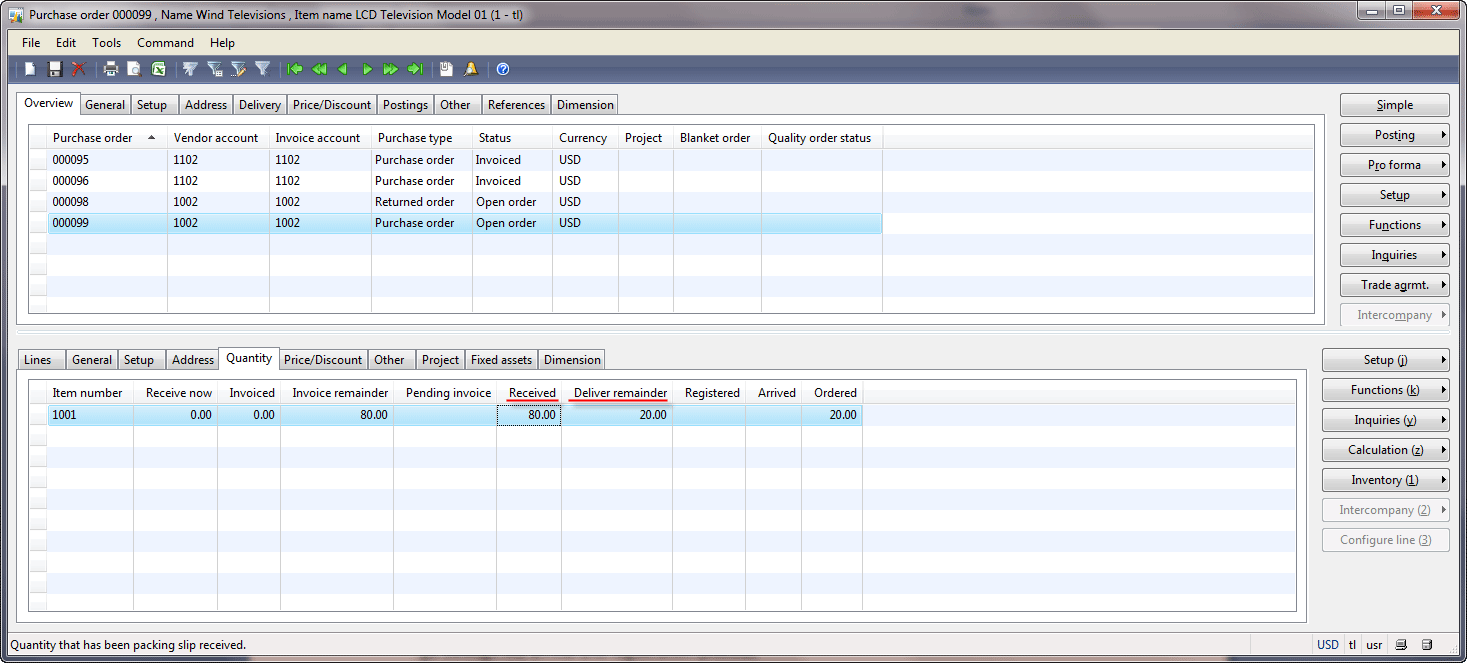 Purchase order form, Quantity tab
- If the company decides to cancel the refused quantity, you need to click Functions > Deliver reminder. The Update remaining quantityform opens.
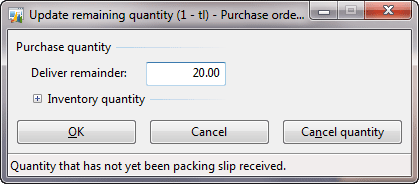 Update remaining quantity form
Either enter 0 in the Deliver reminder field and click OK or click the Cancel quantity button. The ordered quantity will be canceled.
- If we look at the Quantity tab, we will see that there are no deliver reminders and ordered quantity.
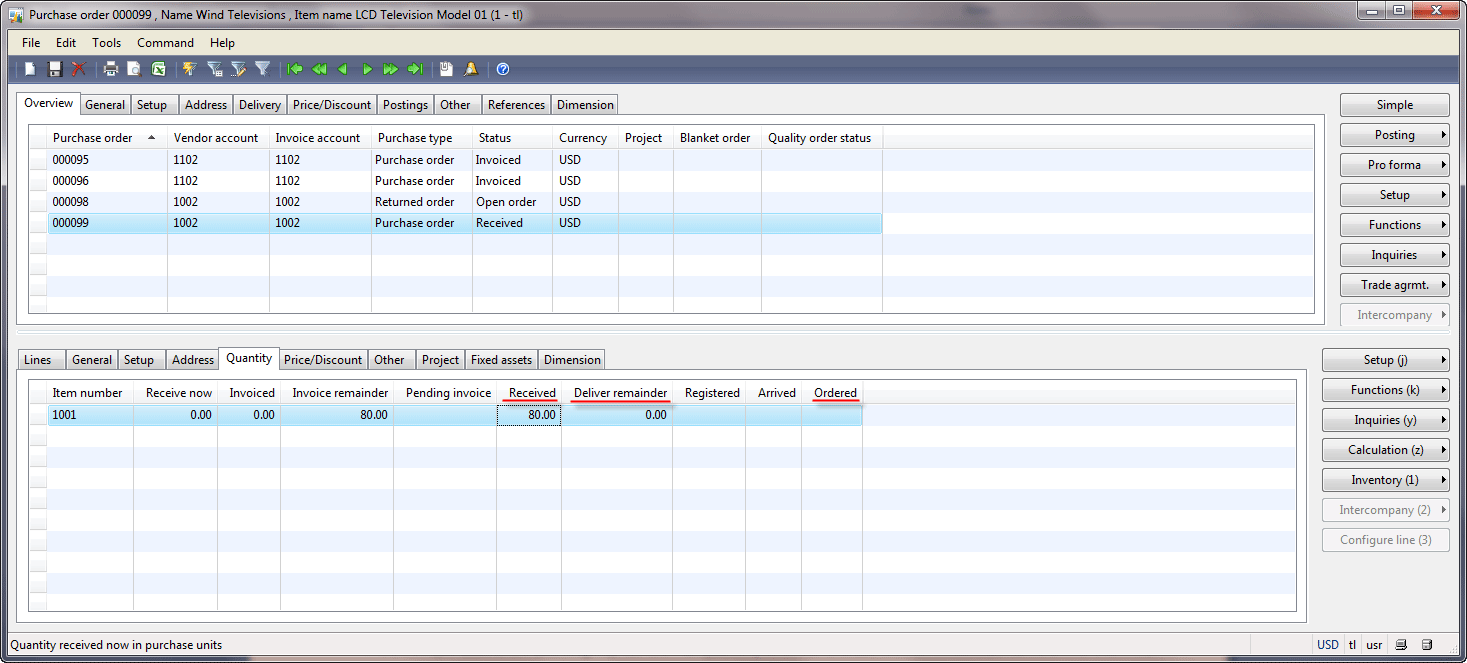 Purchase order form, Quantity tab
Note that the Lines tab contains the ordered quantity (it is for the information purpose) and the purchase order status changed from Open order to Received(because all ordered items are received).
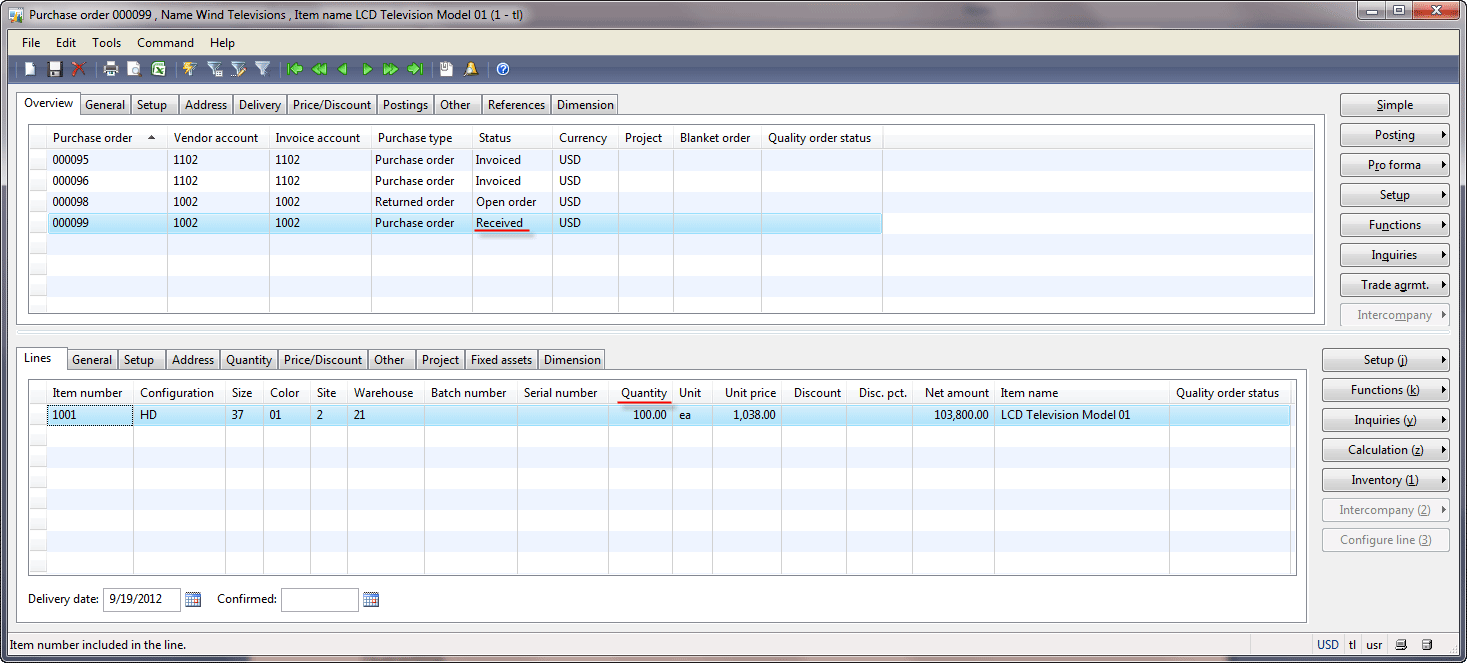 Purchase order form, Lines tab
Another possible variant is if the Purchase Manager posts a packing slip and then the Warehouse Worker finds the broken items. In this case it is also possible to make an adjustment before the invoice. This is done by posting the packing slip with negative quantity. Note that in this case items with the warehouse management setup are picked and shipped from the warehouse (for more info, see
the Shipment lesson). Let’s look at the example for the item without the warehouse management setup.
- Create a new purchase order for the 1002 vendor.
- Create a new line
- Item = 1001
- Configuration = HD
- Size = 37
- Color = 01
- Quantity = 100
- The vendor delivers 100 items. The Purchase Manager posts 100 items in the system. Click Posting > Packing slip > in the Parameter field group, select the All value in the Quantity field > fill in abc in the Packing slip field > go to the Lines tab > make sure that the Update field contains the value 100 > click OK. The items will be posted as received. Note that the 1001 item does not use the warehouse management so it is not required to go through the arrival and registration process.
- To check the posting results, go to the Quantity tab. We can see that 100 items are received.
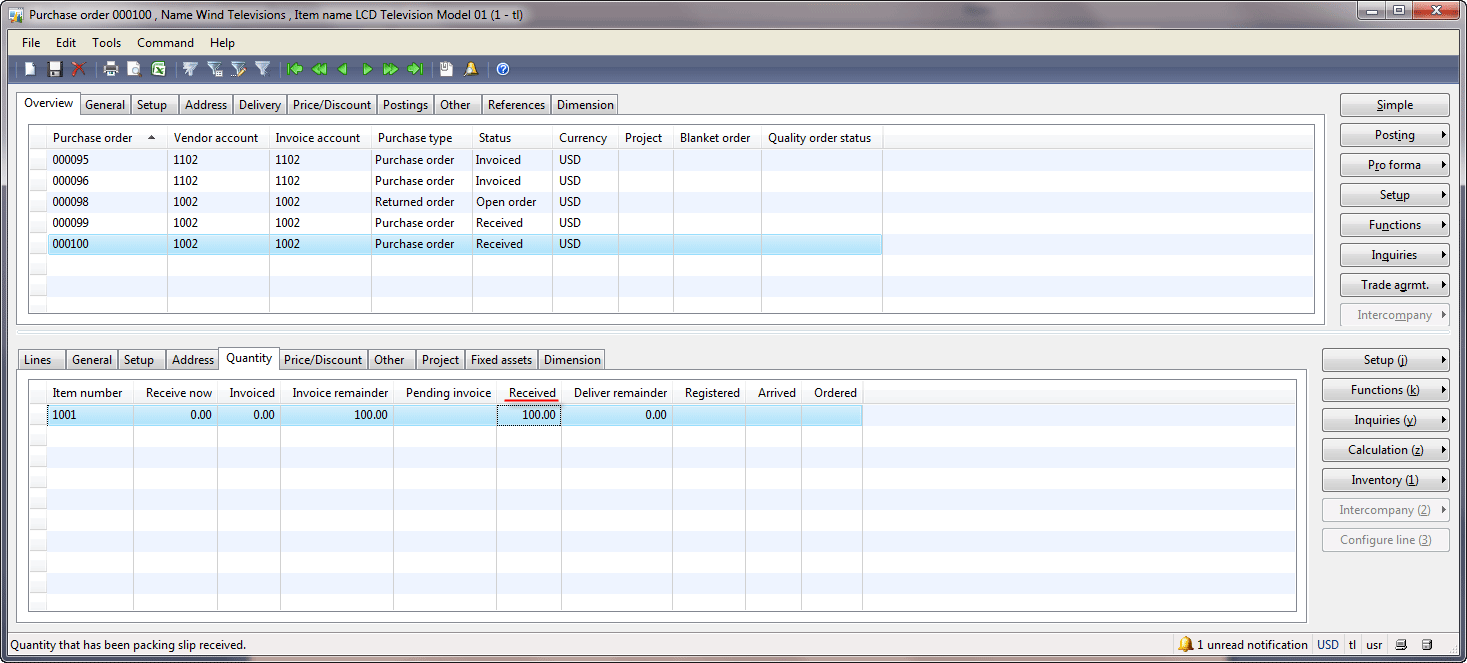 Purchase order form, Quantity tab
- The Purchase Manager was informed that 20 items are broken. He or she decides to send these items back to the vendor. The following should be done in Microsoft Dynamics AX. Fill in -20 in the Receive now field on the Quantity tab.
- Click Posting > Packing slip > in the Parameter field group, select the Receive now value in the Quantity field > fill in abc_Return in the Packing slip field > go to the Lines tab > make sure that the Update field contains -20 > click OK. The items will be posted as received. Note that the 1001 item does not use the warehouse management so it is not required to go through the shipment process.
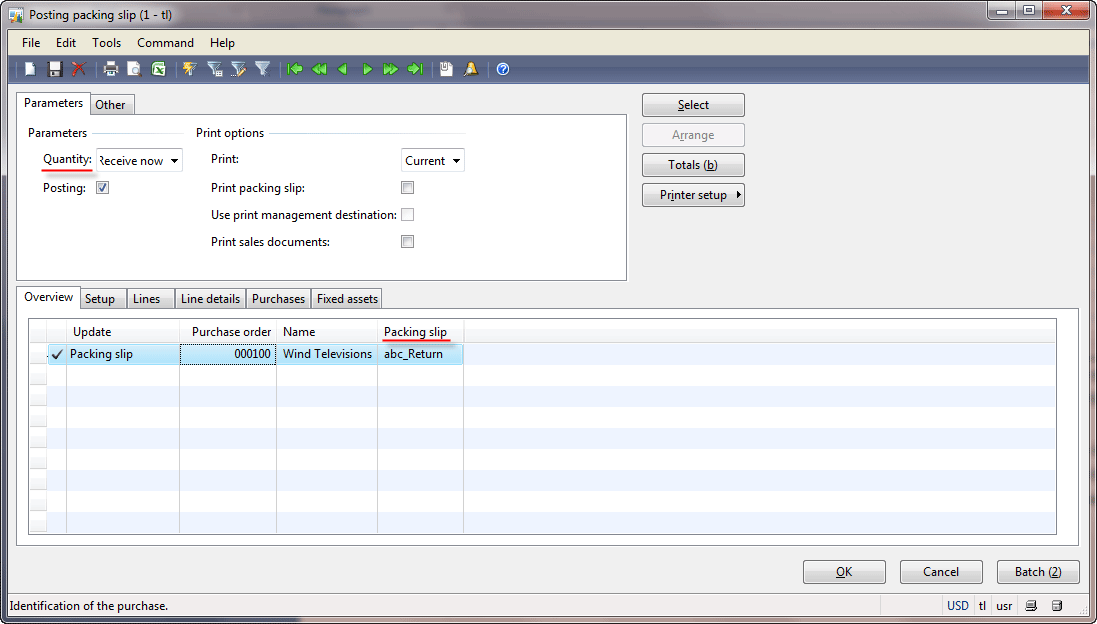 Posting packing slip form
- To check the posting result, go to the Quantity tab in the Purchase order form. We can see that 80 items are received and 20 remain ordered (backordered). The purchase order status changed from Received to Open order.
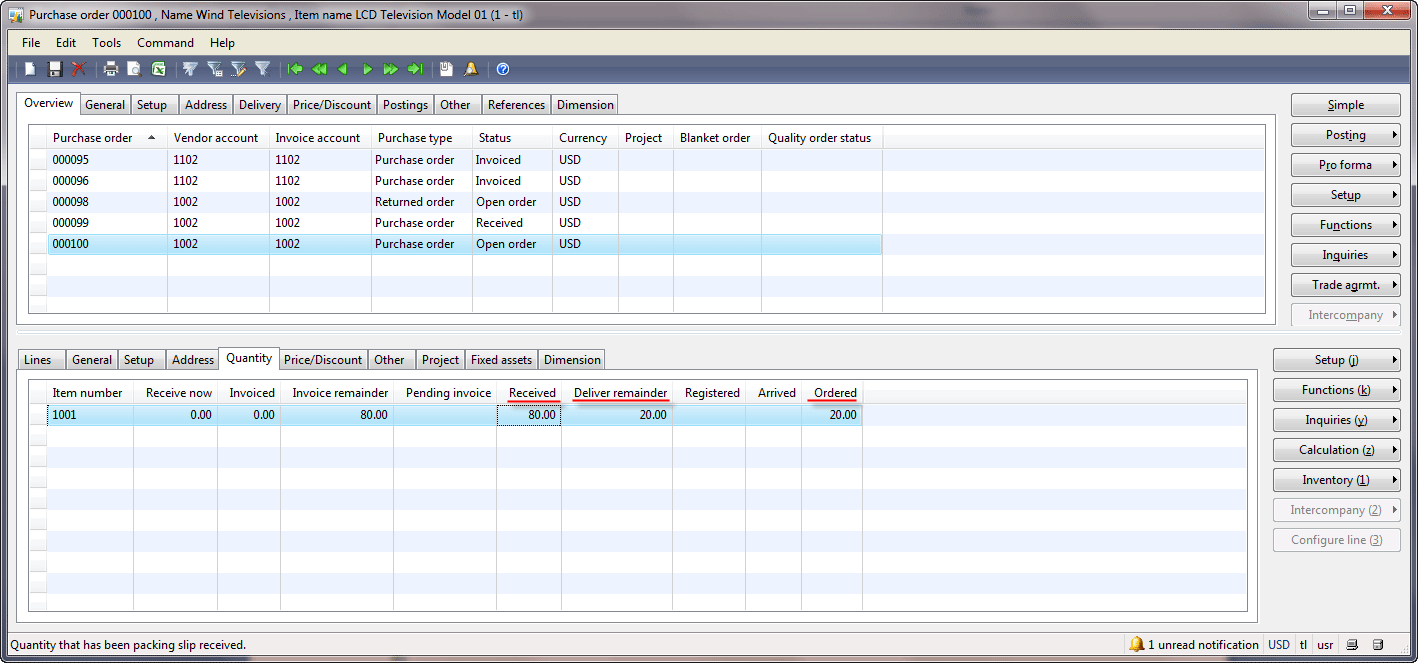 Purchase order form, Quantity tab
This is actually the same as when we post just 80 items. But in this case more inventory transactions are created. Click the Inventory > Transactions button. We can see that posting negative quantity in a packing slip generates three transactions. Note that Microsoft Dynamics AX always generates the Purchased and Sold transactions (i.e. a financial update) when some adjustment with quantity occurs.
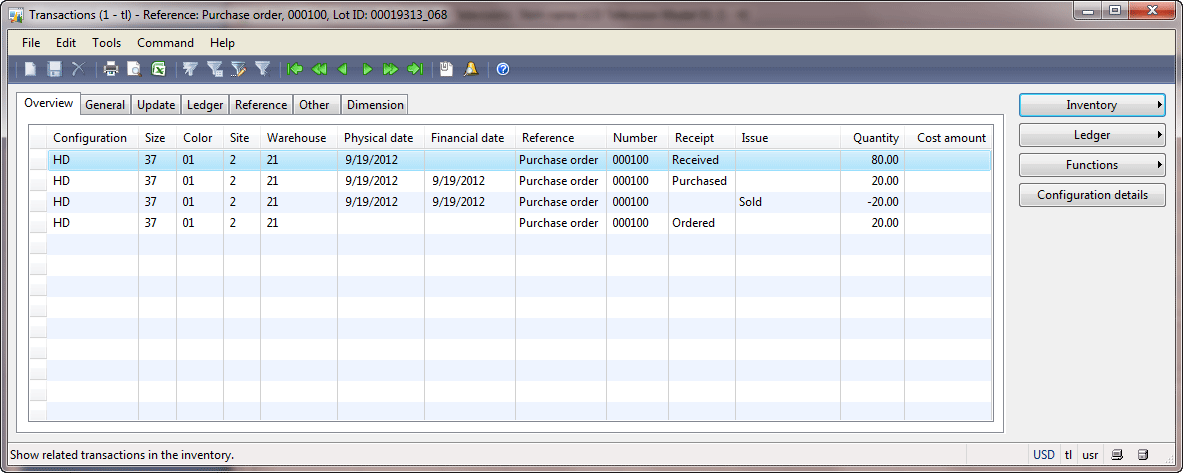 Transactions form (Packing slip)
- Since 20 items remain ordered, the Purchase Manager can cancel this quantity clicking Functions > Deliver reminder function.
Quarantine and Quality Orders
A quarantine order is used to control the quality of items. For example, the company resells mobile phones. Customers often return phones because of their poor quality. The Company can set up the quarantine management and the quality control for the purchased phones.
The quarantine management is used to transfer items to the quarantine warehouse when items are received and return to the destination location when inspection is finished. The quality order is used to set up different tests that should be passed by inspected items.
The quarantine management is set up per item. When items with the quarantine management setup are received, they are transferred to the quarantine warehouse for inspection. Note that the purchase order can be invoiced regardless of the items being inspected or not, and tests passed or not.
The quarantine management is set up in the inventory model group:
Inventory management >
Setup >
Inventory >
Inventory model groups >
Setup tab >
Warehouse management field group >
Quarantine management check box.
Each item is assigned to an inventory model group under
Inventory management >
Common Forms >
Item details >
General tab >
Groups field group >
Inventory model group field.
Information about quarantine orders can be found in
this training lesson, and about the quality order
in this lesson.
Summary
In Microsoft Dynamics AX, a vendor return is a purchase order with negative quantity. The sales flow is used for the returned items (i.e. the returned items are sold from the warehouse).
Remember that a return can take place when items are uninvoiced (delivered only) or invoiced. In first case, it is possible to adjust the quantity, in the second case, we should invoice the quantity to return. Also in the second case, as a rule we should mark the return order with the purchase order.
By default, the payment to vendor is decreased automatically (because of the settlement, the amount for the broken items is excluded).
Technorati Tags:
vendor returns
Источник:
http://www.dynamicsaxtraining.com/fi...vendor-returns

 On-hand form
 Transactions form (Purchased)
 Purchase order with negative quantity
 Voucher transactions form
 Inventory posting form
 Vendor transactions form
 Vendor balance form
 Closed transaction editing form
 Open transaction editing form
 Create purchase order form